Prototype Assignment: The Finale
- Daniel James

- Dec 1, 2022
- 7 min read
Since my last post, my team and I have finished off and presented our final prototype. In this post I will explain all the finishing touches we made.
First and foremost, I should mention that I did manage to come up with a name for the project; "Anti-Virus". The team and I were throwing around ideas for what to call the game and the thought just occurred to me. Its short, descriptive, and a little bit meta, as of course, its a little different to other anti-virus programs you might find on a computer.
Health Bar
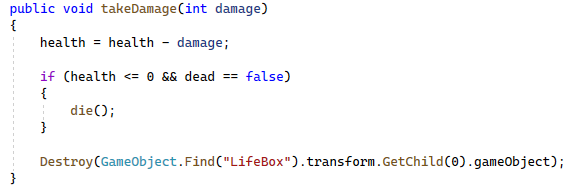
Once that was decided, the rest of the team sent me their versions of the project and I set about compiling all of our work into a final build. I began by implementing the health bar that one of my team-mates had produced. In his version of the game there was a health-bar on screen comprised of 7 sections. Taking damage would remove one of these sections. I simply copied over the art assets into the final build and added the line of code that removed the health bar section, into my player character script. This system was sufficient for this prototype but it could have been improved. There are two common methods for displaying a character's health (or another resource), bars and sprites. Bars are more useful for displaying continuous values as they are able to represent a percentage by how full they are and can show large or decimal numbers clearly without needing to render large numbers of sprites or partial sprites. A number value can even be written on the bar to tell the player exactly how much health they have. Sprites, on the other hand, are good for clearly displaying small, discrete values, as each sprite can be equal to one point of health for instance. In this game our "health bar" was made up of 7 sprites, aligned to appear as though they were a continuous bar. This meant that the UI could not display continuous values, losing the advantage of a bar, and it did not clearly display how many points of health were present, losing the advantage of the sprites. If the game was to be expanded on, I would replace this bar made up of discrete sprites, with a bar that fills based on what percentage of your maximum health you have left. This would allow health to be a float value, making it more flexible.
Health bar:

Take damage function with the UI interaction:
Enemies
Once the player character was able to visibly take damage, it was time to add enemies to deal that damage. Two of my team-mates had created enemy Viruses which chase the player character around and deal damage if they collide with them. I took aspects of each enemy version and built a final version to put into the game. Both previous enemy versions used path-finding methods that were somewhat complex, but still resulted in enemies that fly nearly directly at the player character, ignoring the platforms. I had initially hoped to have enemies that traverse the platforms in the same way that the player character does but there was not enough time to add this functionality to these enemies. I committed to the fact that the enemies flew, ignoring platforms, and wrote a new, much simpler, path-finding script based on the script I used to aim the player character's shooting and dashing. This script calculates the difference between the player's position and their own, to decide what direction to travel in, normalises that value to remove its magnitude, and then gives the enemy a velocity in that direction. This script gives the same, if not better, results than the previous versions, such as the A* algorithm, but is much simpler, so requires less computing power and is easier to modify.
Enemy movement script:

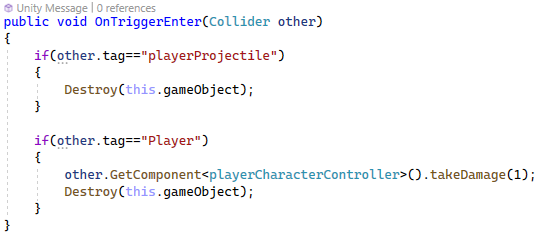
Another issue with the enemies was that they were not colliding with the projectiles fired by the player and, as such, could not be killed. This was because they featured 2D colliders rather than 3D ones and so the issue was easily resolved by swapping those over and adding a short piece of code which destroys the enemy when it collides with a projectile. Enemies also did not die after colliding with the player, necessitating code to turn off the player's hitbox after they collide with an enemy to prevent the enemy hitting them repeatedly in one go and killing them instantly. To resolve this I simply made it so that enemies die upon colliding with the player, allowing me to remove the hitbox toggling code.
Enemy collision code:
Enemy Spawning
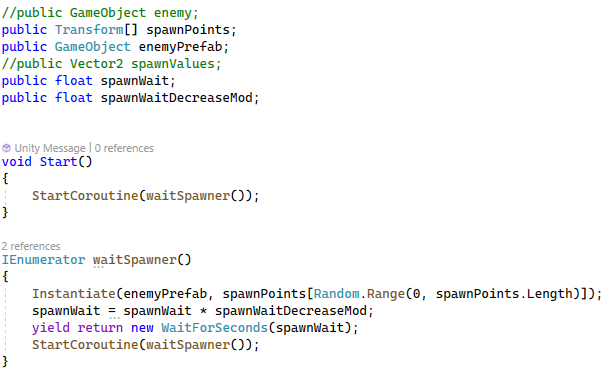
My team had put together an enemy spawner prefab which continuously picked one of several pre-placed spawn points and instantiated an enemy there after a random delay within a certain range. This worked quite well, although I did simplify the code, to make it more efficient. One thing I did change was the delay. A random delay could lead to many enemies could spawning in quick succession, or enemies spawning rarely for extended periods. This meant that the game's difficulty would fluctuate at random. Instead, I wanted the difficulty of the game to increase over time, as this is ultimately a survival game. To do this I removed the randomisation of the spawn delay. Instead, the delay would start at 5 seconds and then be multiplied by 0.95 every time an enemy is spawned, decreasing it by 5%. This caused the game's difficulty to increase over time as enemies would spawn more and more frequently, the longer the player survived. This creates mounting tension for the player, making the game more exciting as it goes along. I opted to decrease the spawn delay by a percentage rather than a flat value each time because this ensures that the spawn delay can never reach zero or below.
Enemy Spawner Script:
Time and Dash UI
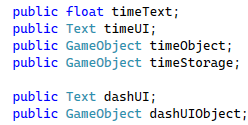
With our enemies fully functional, it was time to add code and UI elements to track how long the player has survived and also how many dashes they have available. For this I just used simple text elements to show a number on screen.
UI Variables in the player character script:
Code in the update function of the player character script to show the time since the game began as a whole number in the UI:

Updates the UI element with the current number of dashes available:

Menus
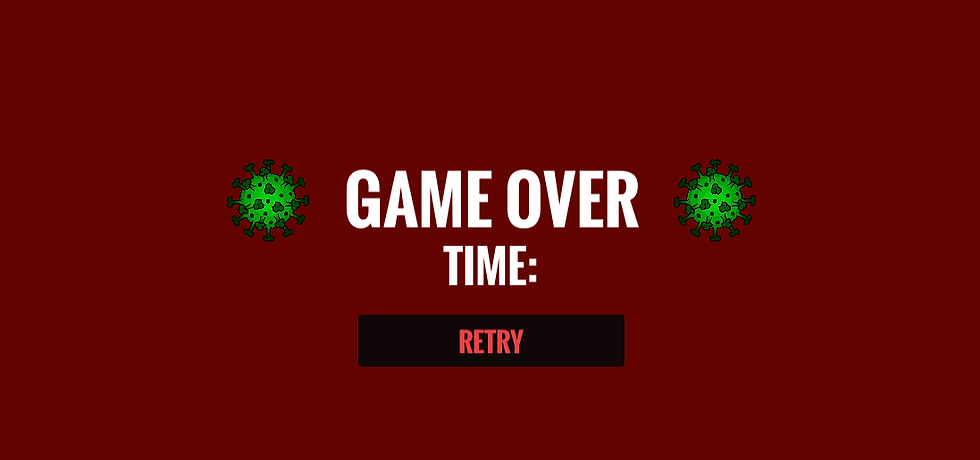
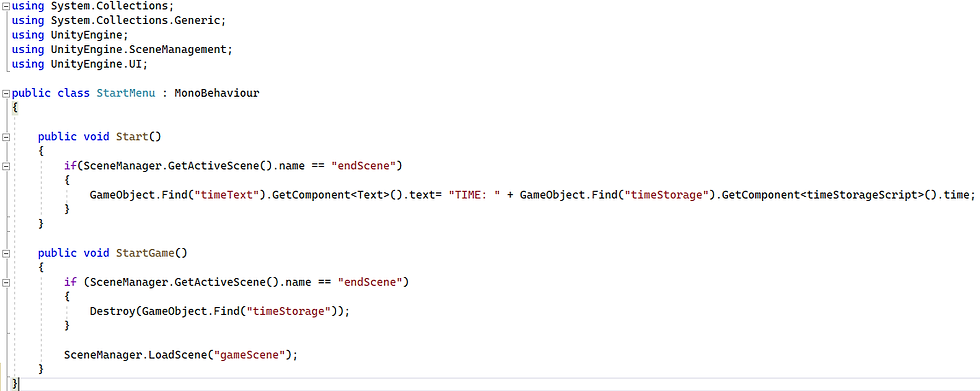
To complete the gameplay loop I implemented the main menu that one of my team-mates had created and then I put together a post-game menu which displays your final survival time and gives the opportunity to play again. The main menu only required some minor edits to the presentation to make it more thematic and add the new game title. The post-game screen was largely just a copy of the main menu but with different text. The major difference was that it required a UI element to display how long the player had survived. To do this, I created a prefab in the in-game scene which stored the game-time and would not be destroyed when loading a new scene. This prefab therefore would still exist in the post-game scene, allowing the time to be displayed. I also modified the menu script provided by my team-mate to allow it to destroy the time storage object when the play again button is pressed in the post-game menu so that you don't end up with multiple of them once a new one is created in the in-game scene.
Main Menu:

Post-Game Menu:
Menu Script:
Art and sound
With all the game functionality complete, it was now time to polish the project off with some art assets and additional sound. Another member of the team had procured sprites for the viruses, the player character, the background and the platforms so it was quick and easy to swap the placeholders for these and then tweak the brightness and colour. The only issue I had here was that the UV mapping that my team-mate had done to ensure that the material on the platforms looked good, could not be copied over from his project into the final one, and so I had to re-do it, with his guidance, to stop the material looking stretched out over the mesh.
My team-mate had also found appropriate music for the game and an enemy death sound. Adding the music was as simple as dropping the audio file into each scene so Unity automatically created an audio-source object to play it on level-load. The enemy death sound was a little trickier as our enemies destroy themselves when killed and so cannot play sound at that point. To resolve this, I added code to the enemies which caused them, when killed but before destroying themselves, to spawn a prefab to play their death sound and then self-destruct.
Building Issues
At this point, the game was complete. All I had to do was press build and then hand it in. Or so I thought. I launched the built game to discover that all of the platforms were invisible! I then spent several hours scouring the internet and attempting to edit Unity's settings and engine code to fix the issue, but to no avail. Our platform mesh was created using probuilder and so I eventually discovered the option to "export" the mesh. I was running out of options and patience at this point so I gave it a go, exported the mesh, and replaced the probuilder asset with it. I built the game again, launched it, and was greeted, finally, with visible platforms. I would have jumped for joy had it not been 3am.
I then attempted to upload the built and editor version of the project to git-hub, but I couldn't get my head round it. I instead opted for the simpler option of uploading it to my onedrive and handing it in via a link to the folder.
Conclusion
This project has been a great experience. Working in a small team, with a prompt, and a very short time frame, provided a variety of new challenges for me and motivated me to be decisive and create a simple, but effective, prototype which I am very proud of. If I were to develop this game further, I would add more enemy and weapon types and add a system to proceduraly generate the level as you move along, making it effectively infinite in each direction, providing more variety and replayability.
Here is a video of the final game:


Comments